Menu

Labels

Monday, 30 May 2011

Blender 2.5 - 'Align selected to active'

Quick tip along with a tip that i learned from the blenderartist.org.

Example of how to apply 'align selected to active' feature


- Load start up scene, than select camera.


- Next, press SHIFT + S and choose 'cursor to selected'


- Add a plane...


- Now, for this feature to work, select plane, press SHIFT and select camera. And from the object menu, transform > align selected to active


- Plane should be oriented the same way as camera. That's it. :)


- And for the other tip. Select plane, go in edit mode, and add two loops in both directions. Than, CTRL + TAB + 3 (to choose 'face select mode'), select face in the middle, X and delete it.


- Press TAB to exit 'edit mode', ALT + SPACE and select 'local' coordinate, and move plane downward along the Z axis just a little.


- Keep the plane selected, press 0 on numpad, and from camea view scale the plane and try matching it with boundaries. While it is selected, make it diffuse black or any color you like.


That's it, now if you render this, you get something like in an image below


In the camera settings, set lens radius to 0.03.


If you want to see more of how to achieve the effect in the image above, take a look in here
Have fun!

Friday, 27 May 2011

Blender 2.5 - Cycles - Dirty surfaces

Ok, a lttle dirt now. It took me some time to figure out this, and i will go straigh to the point...

- You need two objects in the scene for this tutorial, a plane and some extended cube...


- And few textures (i found somethnig on google)

Image A


Image B


- Because image A has to be transparent, it requires some change. Something similar to an image below...


- Next, make box diffuse color yellow...


- Select plane, press TAB, press U and choose unwrap...


- Now, node editor. Make sure that there is material output node.


- Add mix closure node, and connect to the surface.


- Add diffuse node, and connect it to the colsure1.


- Add image texture node...


- And put in image A. It should apear into closure1 image settings


- Connect image coordinate node with image texture node.


- Now, closure2. Connect in this order, glossy node, image texture, and texture coordinate.


- Here you can put image B


- Or it looks something like this


- And when you render it...


Have fun!

Thursday, 26 May 2011

Blender 2.5 - Cycles - alpha channel

Quick and easy tip (now when i now it), just few steps to know when you using alpha.
- First thing you need, is an image (jpg), with black and white colors or any in between, where dark colors are for materials with no transparentcy and white for transparent material.


- In Blender, create three planes, one above other.


- Than add textures to them... 
- For the bottom plane, add difuse material


- For the top plane, add 'emission' node


- And for the middle plane, a bit more. Add 'transparent BSDF' node, than 'image texture' and 'Texture coordinate' node, 'image texture' connected wtih 'uv', in order like in image below.


- Now, select middle plane, press U and from the menu choose 'unwrap'. Than, under the 'suface' parameters, locate an image. Basically, that's all for the alpha channel.


- And in the end, you get something similar to an image below.


Blender 2.5 - Cycles - HDRI - enviroment texture

(This article is outdated, but still useful, newer version will be available soon.)

There are few simple steps for seting up hdri images or any diferent format as an 'enviroment texture' within Cycles. Yet, there's one thing i couldn't find, exposure control for hdri (or i just don't see it). But, there is something similar...
- First thnig first, put some scene into viewport...


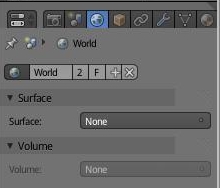
- Now, 'world' panel. 'Surface' settings should set to 'none'.


- Now we'll work from the 'node editor'.


- Make shure there is 'world output' node.
- Add 'baskground' node, and connect it to the 'surface' within 'world output' node.


- Now if we make a preview, we'll see white background.


- In the 'node editor' add 'enviroment texture' node.


- Than locate an image (hdri or any other), if you don't have it google it :)


- Make a preview...


- If the scene is to dark just increase strenght of the background


- If you want a bit more control, you can add 'Mapping' node and 'Texture coordinate' node, than it's posible to rotate, translate and scale background image.


This is a simplest way i managed to put hdri (in this case bmp), but, it probably would be better if there is exposure control. Anyway, 'Cycles' is in early stage of development, it is powerful enough already. 

Wednesday, 25 May 2011

Blender 2.5 - Cycles - Infinite plane

| A newer verison of this tutorial for Blender 2.63 you can take a look at here |

Quite easy to achieve. Just a combination of two nodes, where the second one is always 'Transparent BSDF'. I needed something like this for my industrial purposes, and this is what i came up with... easier couldn't be :)


node setup

-First thing you need is 'mix closure' node,
-Second, connect 'fresnel' node with 'fac' within 'mix closure node', you can setup value as you like (more or less visible primary material), 
-than, add primary material and connect it to 'closure1',
-add 'transparent BSDF' and connect it to 'closure2',
and that's it. :)


It looks something like image below.