Teaser/trailer is out! :)

Monday, 24 December 2012
Friday, 21 December 2012
Project "Loading" teaser - I (update)
One more time project "Loading" teaser - I
Teaser/trailer will be out in a couple of days. A lot of work, some changes, a lot of fun and more project material coming out, soon :)
Teaser/trailer will be out in a couple of days. A lot of work, some changes, a lot of fun and more project material coming out, soon :)
Friday, 2 November 2012
Project "Loading" - Drums Environment
Drums scene environment is the most complicated one, as far the animations goes. There are pretty much plenty of details i had to think of when animating this drums. As a way to solve this kind of an issue, i had to create rigs. Takes forever when i do testing, on the other hand it's fun.
And just to say this now, every scene, that i am working on, i'll make video presentation in time, where i'm going to talk about specifics and troubles i'm having during this project.


And just to say this now, every scene, that i am working on, i'll make video presentation in time, where i'm going to talk about specifics and troubles i'm having during this project.


Thursday, 1 November 2012
Project "Loading" - Second Guitar Environment
(W.I.P.)
Similar story as previous post is. But here, point of interest is hallway. Every environment, have specific story, but similar mood that those scenes are having is covered through the whole animation. Scenes may not be detailed as they supposed to be in the first place, as the main focus will be camera movement, which is actual intention, but, the whole part of visuals rely on post processing. A lot of fun, i must say.


Similar story as previous post is. But here, point of interest is hallway. Every environment, have specific story, but similar mood that those scenes are having is covered through the whole animation. Scenes may not be detailed as they supposed to be in the first place, as the main focus will be camera movement, which is actual intention, but, the whole part of visuals rely on post processing. A lot of fun, i must say.


Wednesday, 31 October 2012
Project "Loading" - Bass Guitar Environment
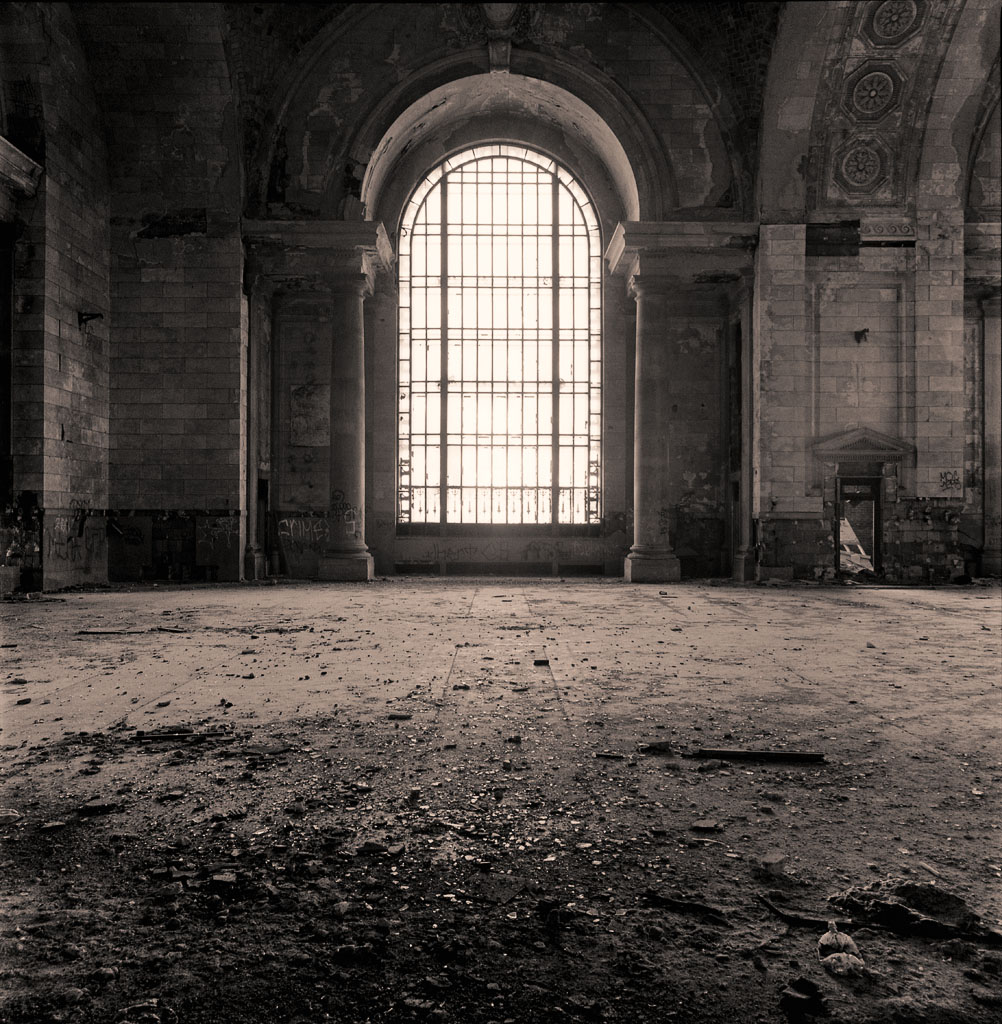
Been thinking for a while about environments and what kind of aproach shall i take. Knowing the interest of the band members, concpet wasn't too much of a problem. The other aproach was to think of the lyrics as the main guide. So, having that in mind i did take a look around for some refrence stuff, to see if i can create something suitable. The main refrence i had found was the Michigan Central Station. At the following site you can see how does it look, if you never had been there, or saw it.
https://www.themotorlesscity.com/photos/michigan-central-station/
Taking everything in consideration, it kinda was choice to go with.
https://www.themotorlesscity.com/wp-content/gallery/michigan-central-station/12159901_05.jpg
Following W.I.P. images showing the scene where the bassist is going to appear:


It's still work in progress, but pretty much showing the actual intention.
Tuesday, 30 October 2012
Project "Loading" - W.I.P. _ Instruments
Project is way ahead, but i'll try to keep an order, and post step by step the whole progress. Following screens are some instruments, which are going to be used in video. Here are shown as simple models, as they were on the begining, but now, instruments have rigs, the thing that i'll talk about in the future.
Yamaha_trb_1005 - Mirioslav Zivkovic

Yamaha_rgx_121_fp - Vladimir Milosavljevic

Gibson_sg_standard_heritage_cherry - Dragan Stojkovic

Sunday, 28 October 2012
"Project Loading" - teaser I
And this is first teaser, first and for opening.
Video specs:
1920x800px
24fps
Project is using:
Blender 3D - visual editing
Ardour Digital Audio Workstation- sound editing
Audacity - sound editing
Gimp - image editing
Video specs:
1920x800px
24fps
Project is using:
Blender 3D - visual editing
Ardour Digital Audio Workstation- sound editing
Audacity - sound editing
Gimp - image editing
About "Project Loading"
"Project loading" is a part of the larger project, and it is a group of a few dudes, and those dudes, are, four dudes, who are members of the band "Loading", and fifth dude, who's job is the whole visual thing, me. I think i said it right...
The main focus of the project is the band "Loading", open source software Blender3D, as well testing it to the high level production, and much more. It is, as well, a part of the years of research that has being focused on medias, social medias, trough the market and backgournd of media product. Project is divided into several segments and it might last through the years from now.
First part of the "Project Loading" is the work on the music video, the single "Odmor" (Rest), it is one of the singles of the upcoming album from the band Loading, and we have our rough assumption that three-four months should be enough to finish the whole thing, we'll see. As this first part is planned mostly to be "testing ground", probably, quality of the visuals may not be as good as i want it to be, and because of the time limit, consequently, i'll have to work a bit faster. The whole first part is going to be done trough animation. It was my own wish, as i have my interst to work on a specific field that Blrnder3D software does not covering, or it does but there's a part still not developed, but it has it's workarounds, and it is related to the post production.
Second part is extended version of the single "Odmor". The second part is intended for the whole thing to be re-done, and that means that band has their own will to re-done their song, and for the visuals, it means that is going to be re-done with preeeeetty much upgraded hardware configuration.
Further plan is to include green screen as well. First idea was to include green sreen in the second part, but considering circumstances and how much time would need to re-done everything in that way, we had to live it as it is, to be animated. After that, green sreen comes in, and waaay much diferent aproach to the whole production. And, that is all i'm gonig to say about what comes than, i'm gonna be quiet for the time being. In time to come, intention is to include developing, it is one of the major elements within "Project Loading", after couple of projects are being done, and i can't say that it is going to happen in near future, but for now that part still remains non-public.
Now not so bright part, the whole thing was planned to begin about year maybe two years ago. As i was constantly under specific circumstances and pressure that is being related to my family, which kinda become intense, i needed to be with family (people from closed circles are mostly familiar with this), and i've cuted of, declined, denyed, rejected maaany project as this one is. People who are familiar with what i had mentioned i while ago, projects still exist, but non of them are finished yet. Now, priorities has been changed, and that is one of the reasons i had to work on this animation. I'll talk more aobut projects in time, but now i am overloaded with things i had to work on.
As my position troughout this project is going to be cleared out, many of the started projects, ideas, and intentions that are related to the Blender communtity and Blender foundation's software, yet, some being putted on hold, should see the light, i believe trough the next couople of years from now.
Now the fun part, the first part of the project is separated, as well, into several segments, there will be a lot of material published before it's being done, containg a lot of behind the scene workflow, which is going to be interesting, i think, mostly for the Blender community.
So these are just couple of words for the, call it.. opening. It's gonna be less talking, i hope, and more visual stuff to have fun with.
Infos and updates coming up trough upcoming days, weeks, months.
Cheers!
"Project Loading"
Aaaand finally, "Project Loading" has now officially started, it has been under construction for some time already. This is one of the largest projects, that i am going to work on, and it might be lasting through the next couple of years.
It's a music video,"Odmor" ("Rest"), for and from the hard rock band "Loading", now, what is actally "Project Loading", i'll explain within next post, i hope. This is just a small announcement, and more details coming up!
It's a music video,"Odmor" ("Rest"), for and from the hard rock band "Loading", now, what is actally "Project Loading", i'll explain within next post, i hope. This is just a small announcement, and more details coming up!
Tuesday, 7 August 2012
Blender 2.63 - Cycles - Infinite plane -(update/ver#1)
(Video tutorial will be available soon)
It's workaround, reason is that i wanted to achieve this effect with material nodes, not compositing, there for i called it wrokaround, anyhow it's working. I hope that this post isn't too long, and hopefully it contain some useful stuff. When the whole node thing is setup, it can be pretty flexible considering results that could be achieved. Ver#2 of this tutorials will be done only by materials, which makes it a lot easier and shorter, but while i figure that out, this tutorial is the thing to go with.
(If at any point this tutorial become confusing or unclear, please let me know, so i can keep tutorial readable... and non-confusing)
Part one - Scene setup

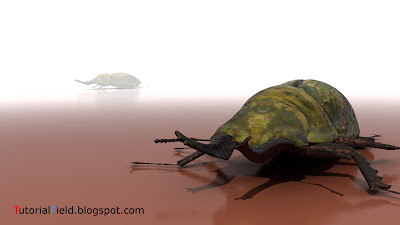
One model is placed near the camera, and the other a bit further.

Form camera view, it looks something like this.

Now, to start form the ground plane.
-set metric units

-add circle

-circle in :)

-enter edit mode, and from Mesh menu choose Fill within Faces submenu.

-cirlce as ground plane

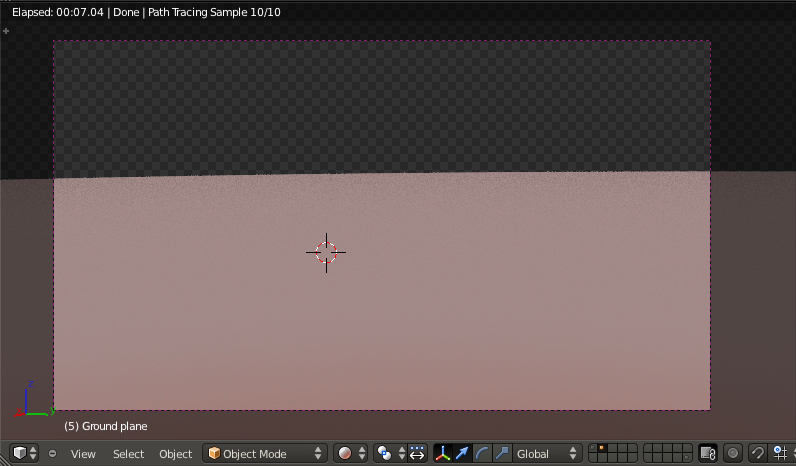
-exit edit mode, and for x, y dimensions ender 600m, it should looks like in the image below

-one more thing, in render settings, under Film tab, check transparent box, i think that this is the option that allows to generate alpha channel.


These are couple of examples on how ColorRamp works:
a)

b)


c)


Next thing are objects.
Any objects could work, cubes, spheres... i used very old allotop model, well it's kinda cool. Any material can do the job as well.


and second one are objects

So, to begin...


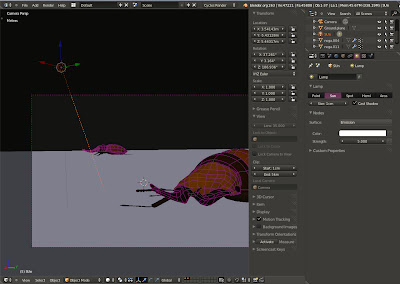
First thing to do is to combine orignal image and z depth, by simply combinig them like in an image below. The result is only white picture.

Now, i need one group, that is gonna generate distance fading, it looks like in an image below.


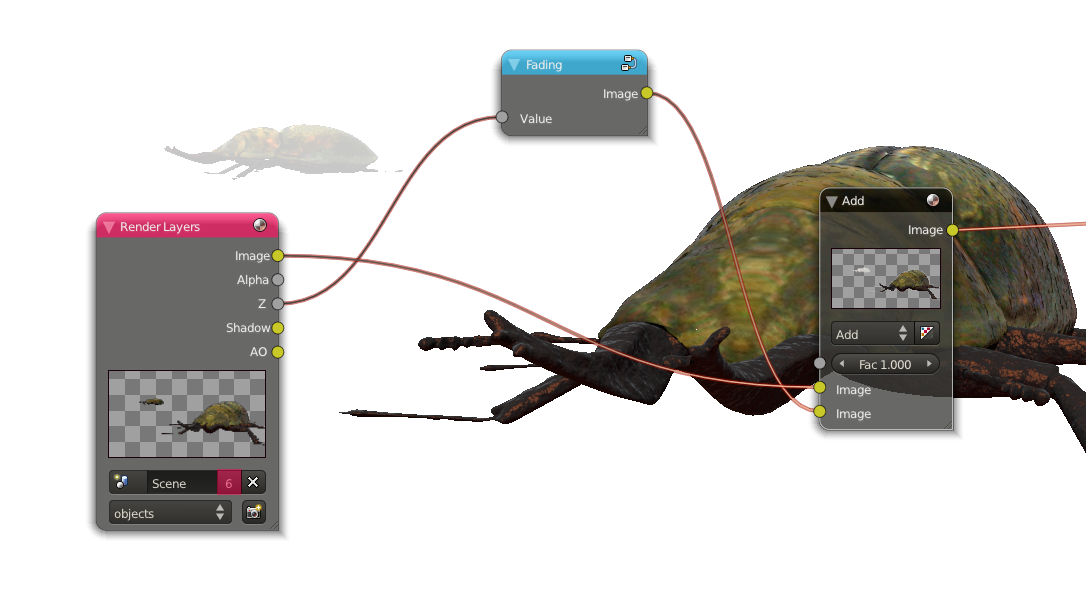
Duplicate Multiply node, and connect AO pass and previous Multiply node to the new one. AO pass should be visable in render.
Now, to make alpha pass visible as white, i need one more Add node. So now, connect last Multiply node and group "fading" to the image inputs within new Add node. And, i wanted control over the Fac as well so i connected group "fading" to the Fac input, as it is shown in the below.

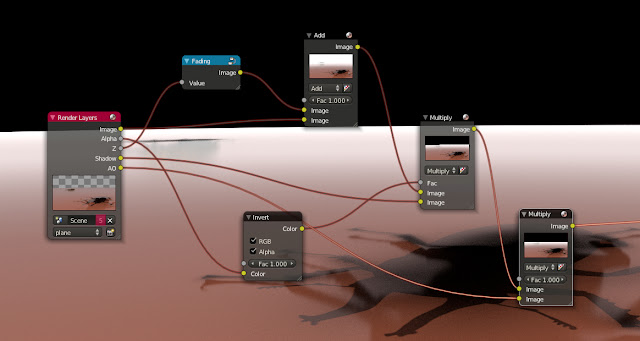
Now second group of nodes.

I'll do the same thing as i did with the first Render layer node. And here is something i should mention. The 'distance fading' (or group "fading") is the effect that Render layers should share.

Because of Render layers combinig issue, Alpha pass need to be connected to the Fac input of Multiply node trought the Invert node, like in an image below. There won't be any changes in the image.

And now the magic comes in. From the first group, connect the last Add node to the Multiply node at second input. We get two Render layers combined. But we have a problem.

If you take a closer look, white line at the edges of the second layer is bit of a problem. This is alpha issue. To solve this, AlphaOver node need to be used.

Start by adding AlphaOver node, and connect both Render Layers to the image inputs, objects with first image input and ground plane with second image input. Here we don't see the objects yet.


Now this is little tricky.

First, connect both MapValues nodes to the first Z Combine node with Z inputs.


The last thing is to connect both Z-Combine nodes with AlphaOver node as it is shown in the image below.


If you need to change environment, there is a quick way to do it. Add Mix node and choose type Darken. Connect AlphaOver node with first image input within Mix node. Second color could be used to change the background or distance.

It's workaround, reason is that i wanted to achieve this effect with material nodes, not compositing, there for i called it wrokaround, anyhow it's working. I hope that this post isn't too long, and hopefully it contain some useful stuff. When the whole node thing is setup, it can be pretty flexible considering results that could be achieved. Ver#2 of this tutorials will be done only by materials, which makes it a lot easier and shorter, but while i figure that out, this tutorial is the thing to go with.
Issue with
previous tutorial i had about infinte plane is that ground is partially
transparent, i didn't like that. So this tutorial is one way to go, it's kinda
long, but once you know how it is done, it could be done in no time.
(If at any point this tutorial become confusing or unclear, please let me know, so i can keep tutorial readable... and non-confusing)
| Click on image to enlarge |
Part one - Scene setup
To test the
effect, we need a couple of objects in the scene, in my case those are sun,
camera, ground, and two models that are used to test the distance fading or
vanishing point.

One model is placed near the camera, and the other a bit further.

Form camera view, it looks something like this.

Now, to start form the ground plane.
It should be
a large plane. So, while i'm in metric units, i'll add a circle first, than in
edit mode, while all vertices are selected, choose fill. Now we have a ground
plane. Because ti has to be a large one, for x and y 600m will be just fine.
-set metric units
-add circle

-circle in :)

-enter edit mode, and from Mesh menu choose Fill within Faces submenu.

-cirlce as ground plane

-exit edit mode, and for x, y dimensions ender 600m, it should looks like in the image below

-one more thing, in render settings, under Film tab, check transparent box, i think that this is the option that allows to generate alpha channel.
-now
material for the ground, i did a little tweaking, very simple
Connect
diffuse and glossy shader nodes with mix shader as it is on the image below.
Now to get
something like fresnel effect, i ain't gonna use fresnel input node as i did
before, there is another one called Layer Weight input node.
Within there
is Fersnel, i think that this is the old one, just moved to another node, newer
have IOR as value.
Connect
Layer weight to the Fac input within Mix Shader node.
Now add
ColorRamp node, and put it between Layer weight and Mix Shader.
What this
option is allowing is to change colors of the ground normal to the camera point
of view.
These are couple of examples on how ColorRamp works:
a)

b)
c)

Next thing are objects.
Any objects could work, cubes, spheres... i used very old allotop model, well it's kinda cool. Any material can do the job as well.

Now, how to
set up this scene for rendering.
Select
Ground plane, in the name field you can change the name that way, and under Relations settings move Ground plane to the second layer, as it is in an
image below.

The other
two object will remain on the first layer.
Light.
Default
light is Lamp, change it form Lamp to Sun. Cast Shadows should be ON, and i
increased strenght to 5.

That is all
i think, as far as it goes for scene setup. Now we moving on to the
compositing.
Part two - Compositing
Tricky
thing... i must say, but it doesn have to be.
This is our
node setup.

Before we
jump into compositing, few more things are needed to setup final render. Those
are layers outputs.
So one more
time i'm going to take a look at render settings. But now under Layers tab. We
need two Render Layers.
First Render
layer i'll keep as it is, i called it "objects", under Layer only the
first layer should be selected, which means that only objects on layer one will
be rendered on fisrt Render Layer.
Also, AO and
Shadow passes need to be selected.

By clicking
on the plus sign at right upper corner, new Render layer will be created. I
called it "plane". On this render layer it should be only second
layer selected. I moved the ground plane to the second layer before.

Now
compositing window.
It can be
separated into three major groups, first one is for the ground plane, second is
for the objects and third one is for combinig first two groups.

After
rendering the scene, we have two images that need to be combined together.
First one is
ground plane

and second one are objects

So, to begin...
First thing
i need is Render layers node. Because i had selected before AO and Shadow
passes, now it is available as outputs on the Render layers node.

Now i need
to combine this passes. The only reason i added this passes is to enhance the
shadows under objects.

First thing to do is to combine orignal image and z depth, by simply combinig them like in an image below. The result is only white picture.

Now, i need one group, that is gonna generate distance fading, it looks like in an image below.
Add Map
Value node, and for the offset enter -15, for the size 0.010, but this is my
case, values depends from models in the scene and size of the scene. Than add
ColorRamp node.
ColorRamp
node will takeover MapValue setups, and by adjusting grey sliders, we are
affecting distance visiblity. Select these two nodes and press CTRL+G to create group.

After z
value from the Render layer node and first input on the Add node is connected,
reconnect those with the group "fading" like it is in an image below. We should get something like in an image below.

Wtih SHIFT+D
we can duplicate Add node and instead of Add choose Multiply. Now Add node and
Shadow pass connect to the Muliply node inputs. Result should be somethig with
sharp edged shadow.
To remove
that problem, i am going to add Alpha pass to the Shadow pass, thus shadow
calculate alpha information.

And, that
can be done by connecting Alpha pass from Render layers node with Fac input on
the Multiply node, but it has to go trought the Invert node.
I think that
both RGB and Alpha should be selected on the Invert node. As a result we have
much better looking shadow.

Duplicate Multiply node, and connect AO pass and previous Multiply node to the new one. AO pass should be visable in render.

Now, to make alpha pass visible as white, i need one more Add node. So now, connect last Multiply node and group "fading" to the image inputs within new Add node. And, i wanted control over the Fac as well so i connected group "fading" to the Fac input, as it is shown in the below.

Now second group of nodes.
I need one
more Render Layer node. In the layer list, layer 'objects" should be
selected. Will get something like in an image below.

I'll do the same thing as i did with the first Render layer node. And here is something i should mention. The 'distance fading' (or group "fading") is the effect that Render layers should share.
By
duplicating this group, groups will share the same information, thus changing
one will affect the other one. What it means that, changing "fading" for one
Render layer, it will affect any other layer that share same fading settings.
Now Image pass and Z pass should be connected to the Add node as it is shown in
the image below, for fading to work.
Because of Render layers combinig issue, Alpha pass need to be connected to the Fac input of Multiply node trought the Invert node, like in an image below. There won't be any changes in the image.

And now the magic comes in. From the first group, connect the last Add node to the Multiply node at second input. We get two Render layers combined. But we have a problem.

If you take a closer look, white line at the edges of the second layer is bit of a problem. This is alpha issue. To solve this, AlphaOver node need to be used.

Start by adding AlphaOver node, and connect both Render Layers to the image inputs, objects with first image input and ground plane with second image input. Here we don't see the objects yet.

Add two more
MapValue nodes, and two Z combine nodes. Now how to connect those in our case.

For more
information about this issue (removing alpha outlines), go here https://wiki.blender.org/index.php/Doc:2.6/Manual/Composite_Nodes/Types/Color
and take a look at the 'Z-Combine Node'.
Connect Z
passes from the Render Layers nodes to the MapValue inputs as it is on the
image.

Now this is little tricky.

First, connect both MapValues nodes to the first Z Combine node with Z inputs.

Second,
connect Z passes from both Render layers to the Z inputs within second
Z-combine node.

Now,
'objects' Multiply node connect with both first image inputs within both
Z-Combine nodes,
and 'ground
plane' Add node connect with both second image inputs within both Z-Combine
nodes..

The last thing is to connect both Z-Combine nodes with AlphaOver node as it is shown in the image below.

And we have
our infinte plane.

If you need to change environment, there is a quick way to do it. Add Mix node and choose type Darken. Connect AlphaOver node with first image input within Mix node. Second color could be used to change the background or distance.
Add Color Balance
node, and here you can play with environment.

Subscribe to:
Posts (Atom)