
(This article is outdated, but still useful, newer version will be available soon.)
There are few simple steps for seting up hdri images or any diferent format as an 'enviroment texture' within Cycles. Yet, there's one thing i couldn't find, exposure control for hdri (or i just don't see it). But, there is something similar...
- First thnig first, put some scene into viewport...

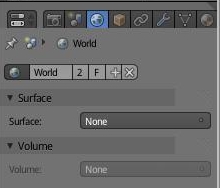
- Now, 'world' panel. 'Surface' settings should set to 'none'.
- Now we'll work from the 'node editor'.

- Make shure there is 'world output' node.
- Add 'baskground' node, and connect it to the 'surface' within 'world output' node.

- Now if we make a preview, we'll see white background.

- In the 'node editor' add 'enviroment texture' node.

- Than locate an image (hdri or any other), if you don't have it google it :)

- Make a preview...


- If the scene is to dark just increase strenght of the background


- If you want a bit more control, you can add 'Mapping' node and 'Texture coordinate' node, than it's posible to rotate, translate and scale background image.

This is a simplest way i managed to put hdri (in this case bmp), but, it probably would be better if there is exposure control. Anyway, 'Cycles' is in early stage of development, it is powerful enough already.
There are few simple steps for seting up hdri images or any diferent format as an 'enviroment texture' within Cycles. Yet, there's one thing i couldn't find, exposure control for hdri (or i just don't see it). But, there is something similar...
- First thnig first, put some scene into viewport...

- Now, 'world' panel. 'Surface' settings should set to 'none'.
- Now we'll work from the 'node editor'.
- Make shure there is 'world output' node.
- Add 'baskground' node, and connect it to the 'surface' within 'world output' node.
- Now if we make a preview, we'll see white background.

- In the 'node editor' add 'enviroment texture' node.
- Than locate an image (hdri or any other), if you don't have it google it :)
- Make a preview...


- If the scene is to dark just increase strenght of the background

- If you want a bit more control, you can add 'Mapping' node and 'Texture coordinate' node, than it's posible to rotate, translate and scale background image.

This is a simplest way i managed to put hdri (in this case bmp), but, it probably would be better if there is exposure control. Anyway, 'Cycles' is in early stage of development, it is powerful enough already.
Thank's a lot. Very helpful ! :)
ReplyDeleteVery easy tutm you saved me a lot of search!
ReplyDeleteThanks and take care :P
Greetings from luxemburg
Thanks so much for explaining this setup so clearly and concisely. It's a big help!
ReplyDeleteHi,
ReplyDeleteI´m new in blender, and I have a question, maybe a stupid one! I ´m trying to use a image background. I did everything like you said, but the image goes out of the "world" and assume a sphere form in the opposite side. It is like my object is out side of world scene,can i send you a picture,is it hard to explain...!!!
I'm not sure if i understood correctly, but, if image goes out of the scene, than viewport clipping should be adjusted.
DeletePress N with cursor over the viewport, in toolbar that appears on the right side, within view tab, increase 'end' value for clipping. If this doesn't solve the thing than you could send me an image or file which is better.
I was hoping to find this tutorial again, thanks a lot author!!
ReplyDeleteHi,
ReplyDeleteI tried the tute but:
1. In the 'world' panel I set 'Surface' to 'background', otherwise the bkgrnd gets black, not white.
2. The effect of the whole procedure is single color rather than image - the sky gets no tex, just blue.
Maybe some suggestions? Would be really thankful...
Cheers,
SIlgrin
Hi SIlgrin,
Deletetutorial is a bit out of date, but the node order is still working,
in general it's:
- Environment texture > Background > World output.
With default settings it only requires an image within 'Environment texure' node, and it should work.
The other usage of background is 'Sky texure' node, the order is the same.
- Sky texture > Background > World output
With default settings it should work.
When 'Background' node is a single node that has been used, result is single color, but, if you connect 'Sky texture' node, or, 'Environment texture' node (with image assigned) to 'Background' node, you get 'real sky' background.
I hope this help.
Very soon i'll start again with making tutorials, and all the ones that are outdated, i'll make updated versions.
Igor
Thanks for your great post. Really I like your post very much and you highlighted many important things. Waiting for your next post.
ReplyDeletedizi fragman izle
ReplyDeleteits very nice and amazing projected.